Objective
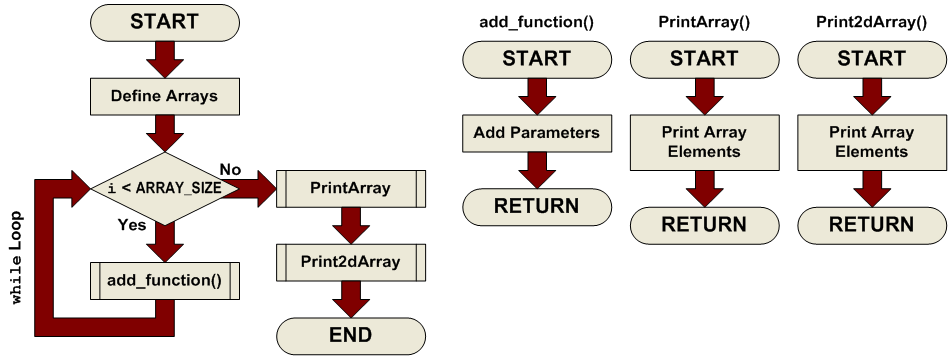
The purpose of this lab is to help you understand how to create and use arrays. The main concepts include defining and initializing arrays, passing array elements to functions and assigning function results to array elements. The code will also illustrate how to print out elements of an array to the Simulator UART1 I/O window.
Software Tools
| Tool | About | Installers |
Installation
Instructions |
||
|---|---|---|---|---|---|
| Windows | Linux | Mac OSX | |||
|
MPLAB® X
Integrated Development Environment |
| | | | |
|
MPLAB® XC16
C Compiler |
| | | | |
Exercise Files
| File | Download |
Installation
Instructions |
||
|---|---|---|---|---|
| Windows | Linux | Mac OSX | ||
|
Project and Source Files
|
| | | |
Procedure
Open the Project
Start MPLAB® X IDE, then click on the Open Project icon on the main toolbar
Navigate to the folder where you saved the exercise files for this class.
Click on the Lab10.X folder.
Select Open Project.
Open C Source File

Open the Lab10.c source file from the project tree by double clicking on its icon.
This will bring up Lab10.c in a window to edit.
Edit Source File
In this lab, some of the code has been placed in a separate file to keep things simple where you need to make your edits. Specifically, the printArray() and print2dArray() functions have been placed in the file PrintArray.c.
All of the edits in this lab will be made in Lab10.c
STEP 1:
Create two initialized arrays with 10 elements each named array1 and array2 (you may use the pre-defined constant ARRAY_SIZE as part of the array declaration). The arrays should be initialized with the following values:
- array1: 0, 1, 2, 3, 4, 5, 6, 7, 8, 9
- array2: 9, 8, 7, 6 ,5, 4, 3, 2, 1, 0
Note: the elements are all of type int.
STEP 2:
Pass the two arrays you declared above (array1 and array2) to the function add_function() (see its definition below). Store the result of the function in the array result[]. The idea here is to add each corresponding element of array1 and array2 and store the result in result[]. In other words, add the first element of each array and store it in the first element of result[], then add the second elements, and so on. Take advantage of the counter variable i to make this happen.
Debug Project
Once you finish writing the code:
Click on the Debug Project button. This will build and send the program to the simulator.
Click on the Continue
 button. This begins the simulation.Wait for the UART 1 Output window to finish printing.
Click on the Halt
 button. This will stop execution so that we may examine the results.
Results

After building and running your code, you should see the following results in the UART1 Output window:
Code Analysis
(NOTE: Line numbers correspond to those in the provided solution file.)
Lines 28-31
STEP 1:
Creates two initialized arrays, and gives you the size in the form of a constant (ARRAY_SIZE) and the data to initialize them with:
int array1[ARRAY_SIZE] = {0 , 1 , 2 , 3 , 4 , 5 , 6 , 7 , 8 , 9};
int array2[ARRAY_SIZE] = {9 , 8 , 7 , 6 , 5 , 4 , 3 , 2 , 1 , 0};
So, both the arrays look similar. To initialize them as part of their declaration, all you needed to do was follow the declaration by an equals sign and a comma delimited list of data enclosed in curly braces.
Line 69
STEP 2:
At this point, we are inside a while loop, with an incrementing variable i which is checked against the constant ARRAY_SIZE at each pass of the loop. The idea here was to pass the corresponding elements of each array to the add_function() and store the result in the array result[]. To do this, we can use the counter variable i as the array index for each pass of the loop:
result[i] = add_function(array1[i], array2[i]);
In the context of the loop, the following operations will take place:
result[0] = array1[0] + array2[0]
result[1] = array1[1] + array2[1]
result[2] = array1[2] + array2[2]
result[3] = array1[3] + array2[3]
…
result[9] = array1[9] + array2[9]
End Debug Session
End the Simulation Session by clicking the Finish Debugger Session button.
Clear out the UART 1 Output window (Ctrl + L)
Close the Project.
Conclusions
Here you have learned how to create and use arrays. Frequently, arrays are manipulated within loops where the same operation needs to be carried out on a series of related variables, as we have seen here. The array index may be a variable, which gives us tremendous flexibility for accessing arrays based on some conditions we setup in our programs.
Arrays may also be used in a lookup table like scheme, where a variable is used as an offset into the table (via the array index) to retrieve a particular value from the list (array values).
Arrays are also used to implement text strings in systems incorporating sophisticated user interfaces with some sort of text capable display (LCD, VFD, PC interface, etc.)